This guide helps you get started with Python for 3D Data Science. It covers the essential steps in setting up your environment, including the resources you’ll need and the workflow to follow. By the end of this guide, you’ll have a working environment set up and be ready to delve into 3D data science with Python. The first result is a synthetic point cloud shape generator.
1. The 3D Python Setup
This guide assumes you are a beginner with little to no experience with Python. The goal is to get you up and running with a Python environment specifically designed for working with 3D data.
2. Related Resources for 3D Python 🍇
- 💻The Code: Github Repository (Shape Generator)
- The Handout: 1-Side Cheat Sheet (.pdf)
- The Software (Open-Source):
- Anaconda (https://www.anaconda.com/products/distribution) or Miniconda (https://docs.anaconda.com/en/latest/miniconda.html): Anaconda is a free and open-source distribution of Python that includes a package manager called conda. Miniconda is a smaller version of Anaconda that only includes Python and the conda package manager. You can choose either Anaconda or Miniconda for this guide.
- Python 3.9: This is the recommended version of Python for this guide.
- Useful Python libraries:
- NumPy (https://numpy.org/): A fundamental library for numerical computing in Python.
- SciPy (https://scipy.org/): Another library that builds on NumPy and provides additional functionalities for scientific computing.
- scikit-learn (https://scikit-learn.org/stable/): A machine learning library for Python.
- Matplotlib (https://matplotlib.org/): A library for creating static, animated, and interactive visualizations in Python.
- Open3D (https://open3d.org/): A library designed specifically for working with 3D data in Python.
3. The 3D Python Environment Workflow 🗺️
The following steps will guide you through setting up your 3D Python Environment for 3D data science:
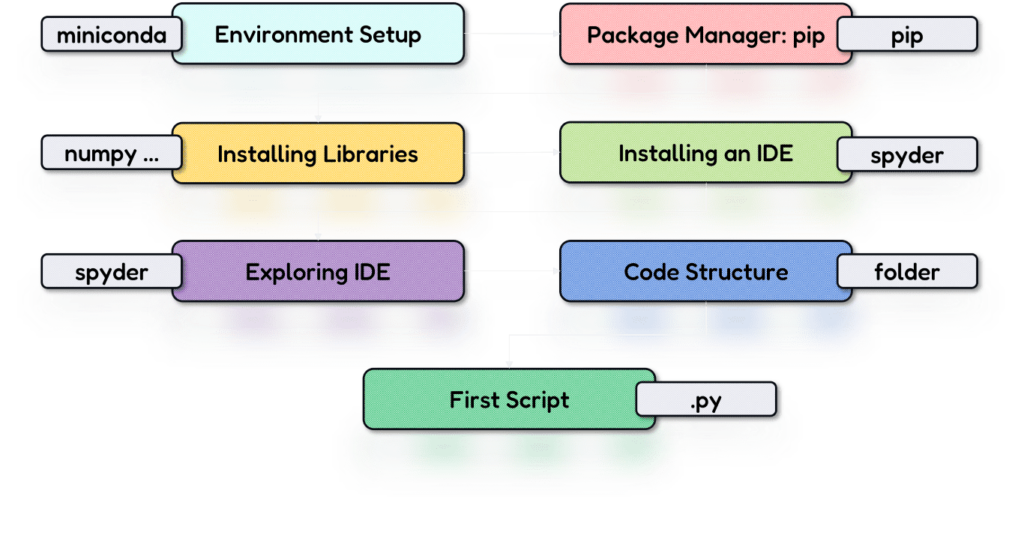
- Environment Setup with Miniconda: Download and install Miniconda following the instructions on the Anaconda website.
- Package Manager and Using Pip: Use pip, the recommended package manager for Python environments, to install the necessary libraries.
- Installing Libraries: Install essential libraries like NumPy, SciPy, scikit-learn, Matplotlib, and Open3D using pip.
- Installing an IDE: Install an IDE (Integrated Development Environment) like Spyder to write and execute Python code.
- Exploring the IDE: Familiarize yourself with the functionalities of the Spyder IDE.
- Structuring Your Code for First Applications: Organize your code using folders for code, data, and results.
- Your First Script: Create a Python script to generate a random point cloud and visualize it in 3D using Open3D.
After following this simple 7-step workflow, you will be able to generate simple 3D Shapes as point clouds, such as cubes, spheres, and planes.
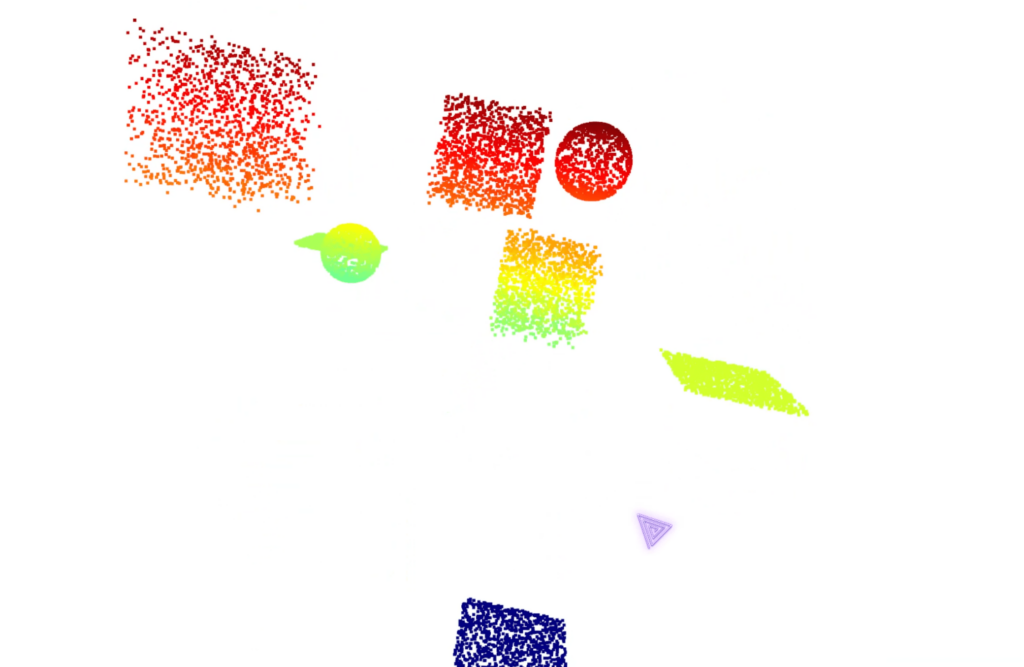
The Code for these can be found on my Github Page (link in section 2). Below is a snippet:
import numpy as np
import open3d as o3d

def generate_random_point_cloud(num_points=5000, num_shapes=1):
    # Initialize an empty list to store all points
    points = []

    # Generate multiple shapes
    for * in range(num*shapes):
        # Randomly choose a shape type
        shape_type = np.random.choice(['sphere', 'cube', 'plane'])
        # Calculate number of points for this shape
        shape_points = num_points // num_shapes

        if shape_type == 'sphere':
            # Generate points on a sphere
            radius = np.random.uniform(0.5, 1.0)
            theta = np.random.uniform(0, 2*np.pi, shape_points)
            phi = np.random.uniform(0, np.pi, shape_points)
            x = radius * np.sin(phi) * np.cos(theta)
            y = radius * np.sin(phi) * np.sin(theta)
            z = radius * np.cos(phi)
        elif shape_type == 'cube':
            # Generate points in a cube
            x = np.random.uniform(-1, 1, shape_points)
            y = np.random.uniform(-1, 1, shape_points)
            z = np.random.uniform(-1, 1, shape_points)
        else:  # plane
            # Generate points on a plane (z=0)
            x = np.random.uniform(-1, 1, shape_points)
            y = np.random.uniform(-1, 1, shape_points)
            z = np.zeros(shape_points)

        # Generate a random center for the shape
        shape_center = np.random.uniform(-5, 5, 3)
        # Add the shape's points to the main list, offsetting by the shape's center
        points.extend(np.column_stack((x, y, z)) + shape_center)

    # Convert the list of points to a numpy array and return
    return np.array(points)

#%% Random Experiments
# Generate random point cloud with 10000 points and 8 shapes
point_cloud = generate_random_point_cloud(10000, 8)

# Create Open3D point cloud object
pcd = o3d.geometry.PointCloud()
pcd.points = o3d.utility.Vector3dVector(point_cloud)

# Visualize the point cloud
o3d.visualization.draw_geometries([pcd])
4. The Next 3D Python Steps 🦶
This guide provides a solid foundation for working with 3D Data Science in Python. Once you have a working environment, you can explore further tutorials and experiment with more complex 3D data manipulation and analysis tasks. The provided resources will serve as valuable references as you continue your journey in 3D Data Science with Python.
My 3D Recommendation 🍉
This 3D Python Environment Setup is your first step towards massive automation. If you want to continue to explore what is feasible with Python, I recommend checking out other tutorials or jumping onto the Weekly Newsletter, which is accompanied by a free Email Course that shares the main solutions to 3D Python Development and more.
Other 3D Tutorials
- 3D Pipeline Architecture: A Founder’s Blueprint
- Multi-View Engine for 3D Generative AI Models (Python Tutorial)
- 3D Scene Graphs for Spatial AI with NetworkX and OpenUSD
- 3D Reconstruction Pipeline: Photo to Model Workflow Guide
- Synthetic Point Cloud Generation of Rooms: Complete 3D Python Tutorial
- 3D Generative AI: 11 Tools (Cloud) for 3D Model Generation
- 3D Gaussian Splatting: Hands-on Course for Beginners
- Building a 3D Object Recognition Algorithm: A Step-by-Step Guide
- 3D Sensors Guide: Active vs. Passive Capture
- 3D Mesh from Point Cloud: Python with Marching Cubes Tutorial
- How To Generate GIFs from 3D Data with Python
- 3D Reconstruction from a Single Image: Tutorial
- 3D Reconstruction Methods, Hardware and Tools for 3D Data Processing
- 3D Deep Learning Essentials: Ressources, Roadmaps and Systems
- Tutorial for 3D Semantic Segmentation with Superpoint Transformer
If you want to get a tad more toward application-first or depth-first approaches, I curated several learning tracks and courses on this website to help you along your journey. Feel free to follow the ones that best suit your needs, and do not hesitate to reach out directly to me if you have any questions or if I can advise you on your current challenges!
Open-Access Knowledge
- Medium Tutorials and Articles: Standalone Guides and Tutorials on 3D Data Processing (5′ to 45′)
- Research Papers and Articles: Research Papers published as part of my public R&D work.
- Email Course: Access a 7-day E-Mail Course to Start your 3D Journey
- Youtube Education: Not articles, not research papers, open videos to learn everything around 3D.
3D Online Courses
- 3D Python Crash Course (Complete Standalone). 3D Coding with Python.
- 3D Reconstruction Course (Complete Standalone): Open-Source 3D Reconstruction (incl. NERF and Gaussian Splatting).
- 3D Point Cloud Course (Complete Standalone): Pragmatic, Complete, and Commercial Point Cloud Workflows.
- 3D Object Detection Course (3D Python Recommended): Practical 3D Object Detection with 3D Python.
- 3D Deep Learning Course (3D Python Recommended): Most-Advanced Course for Top AI Engineers and Researchers
3D Learning Tracks
- 3D Segmentator OS: 3D Python Operating System to Create Low-Dependency 3D Segmentation Apps
- 3D Collector’s Pack: Complete Course Track from 3D Data Acquisition to Automated System Creation