Learn to build a complete Synthetic point cloud generation engine in Python. Create labeled synthetic data for machine learning with our step-by-step tutorial using NumPy and Open3D
Collecting 3D point cloud data takes time.
This means it can be expensive, time-consuming, and prone to generating massive datasets.
Let me show you an alternative way…
This new way aims to bypass:
- Spending thousands on LiDAR equipment
- Manually scanning environments for hours
- Laboriously hand-labeling each scan
- Creating small, limited datasets
- Struggling with occlusions and scanner artifacts
We are going to generate unlimited training examples with automated labeling and parameter control.
This can be a great asset, especially if you need to simulate scenarios or if you want to train AI models without actually going on-site and measuring tons of buildings.
Let us dive right in!
🎼 Note: This tutorial is offered to you as part of my goal to open 99% of my work. To support this vision while joining the top 0.1% of 3D Experts, you can download an Operating System to specialize in 3D Reconstruction, 3D Data Processing, or 3D Deep Learning.
Have a great read 📜
The Mission: Synthetic point cloud generation
You’re the lead developer at an ambitious computer vision startup with a breakthrough algorithm for 3D scene understanding. There’s just one problem…
Your algorithm needs thousands of labeled 3D scenes to train properly, but your budget won’t cover expensive LiDAR equipment or the countless hours of manual annotation.
The CTO calls an emergency meeting.
“We need 5,000 perfectly labeled 3D room scenes by the end of the month,” she announces. “If we miss this deadline, we lose our funding.”
Everyone looks at you.
“That’s impossible,” another developer protests. “Scanning and labeling even 50 rooms would take that long.”
You smile. “Actually, I have a solution. We don’t need to scan a single room.”
By the end of this article, you’ll be able to:
- Generate unlimited 3D point cloud rooms with perfect semantic labels
- Control every aspect of the data, from room dimensions to object placement
- Create variations that would be impossible to collect in the real world
- Export industry-standard PLY files ready for any ML pipeline
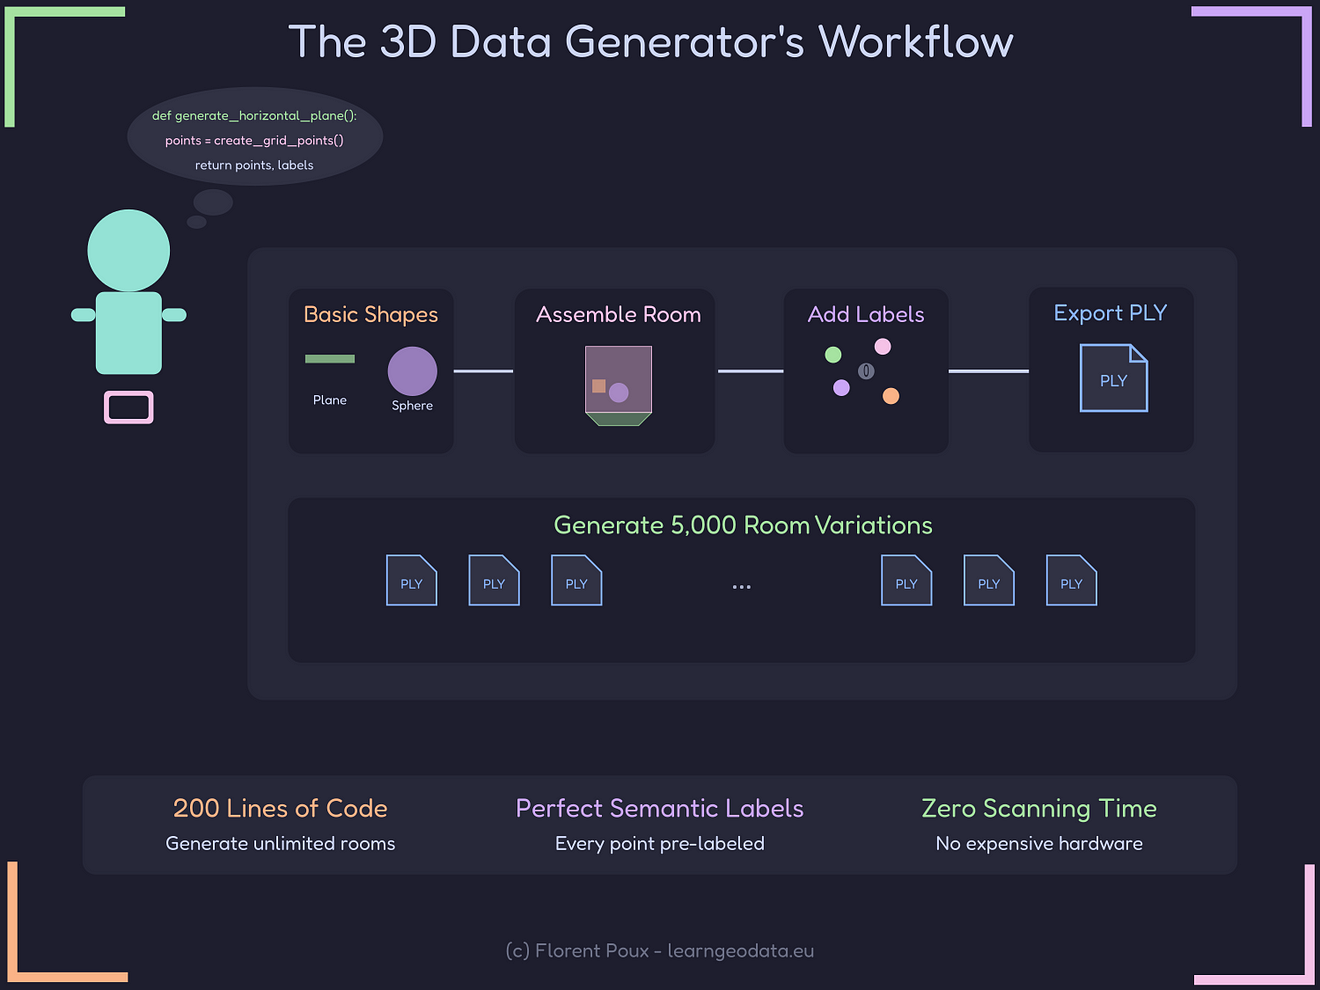
- Build a complete data generation pipeline in less than 200 lines of Python code
Your data-generation superpowers will transform you from a resource-constrained developer to the MVP who saved the project — all without buying a single piece of hardware.
Let’s create your first synthetic room.
The Building Blocks Approach for Synthetic point cloud generation
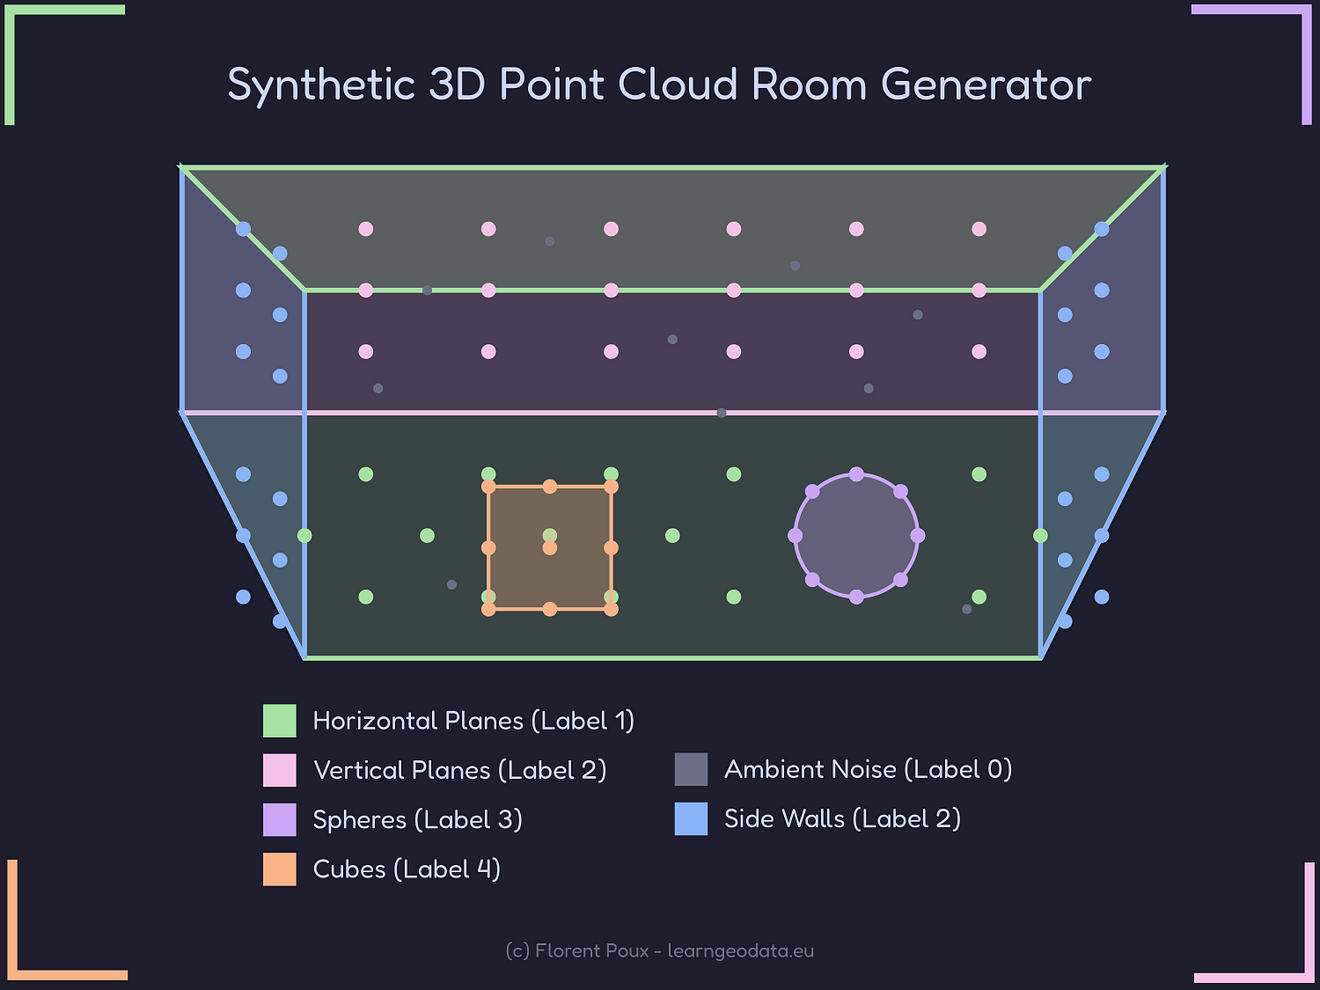
If we look at the mission from a far perspective, we first need to build a sound geometric base for Synthetic point cloud generation. This will be a “Synthetic point cloud”, which is a collection of 3D coordinates generated with mathematical precision.
To determine how to generate these points, we can reason with a human eye: a room is constituted of simple geometric shapes.
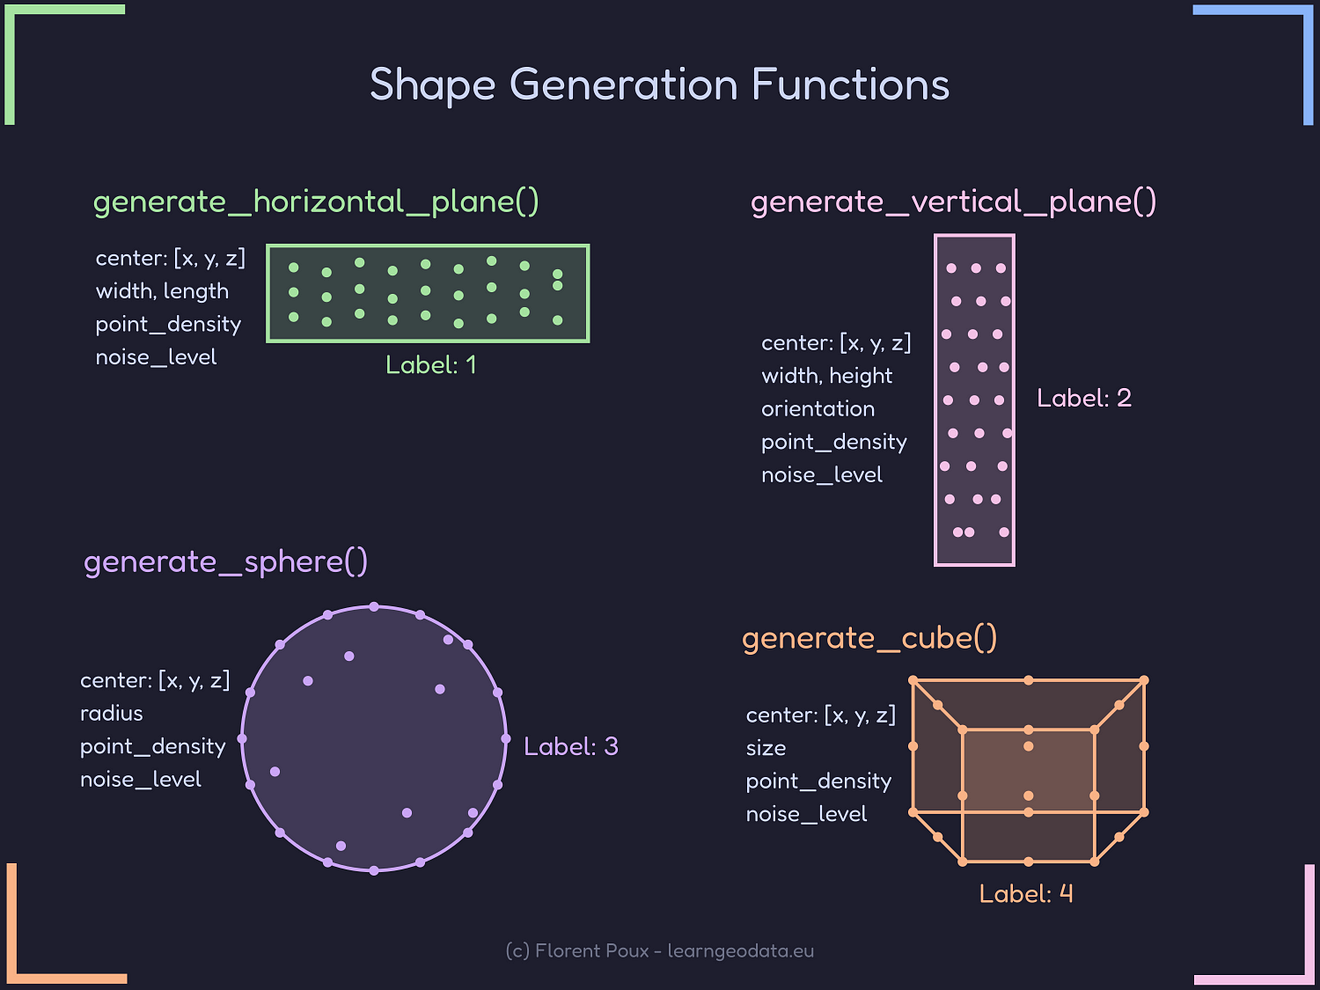
Therefore, the foundation of our generation system relies on four primitive shapes: horizontal planes, vertical planes, spheres, and cubes.
Then, we can combine them to create realistic indoor environments.
🌱 Florent Poux, Ph.D.: After years of working with 3D data, I’ve found that these four primitives cover about 80% of indoor environments. I initially implemented more complex shapes like cylinders and cones, but the additional complexity rarely justified the minimal visual improvement. Start simple!
Therefore, we need to actually find a way to generate each type of shape, while keeping things simple, and with an automation perspective.
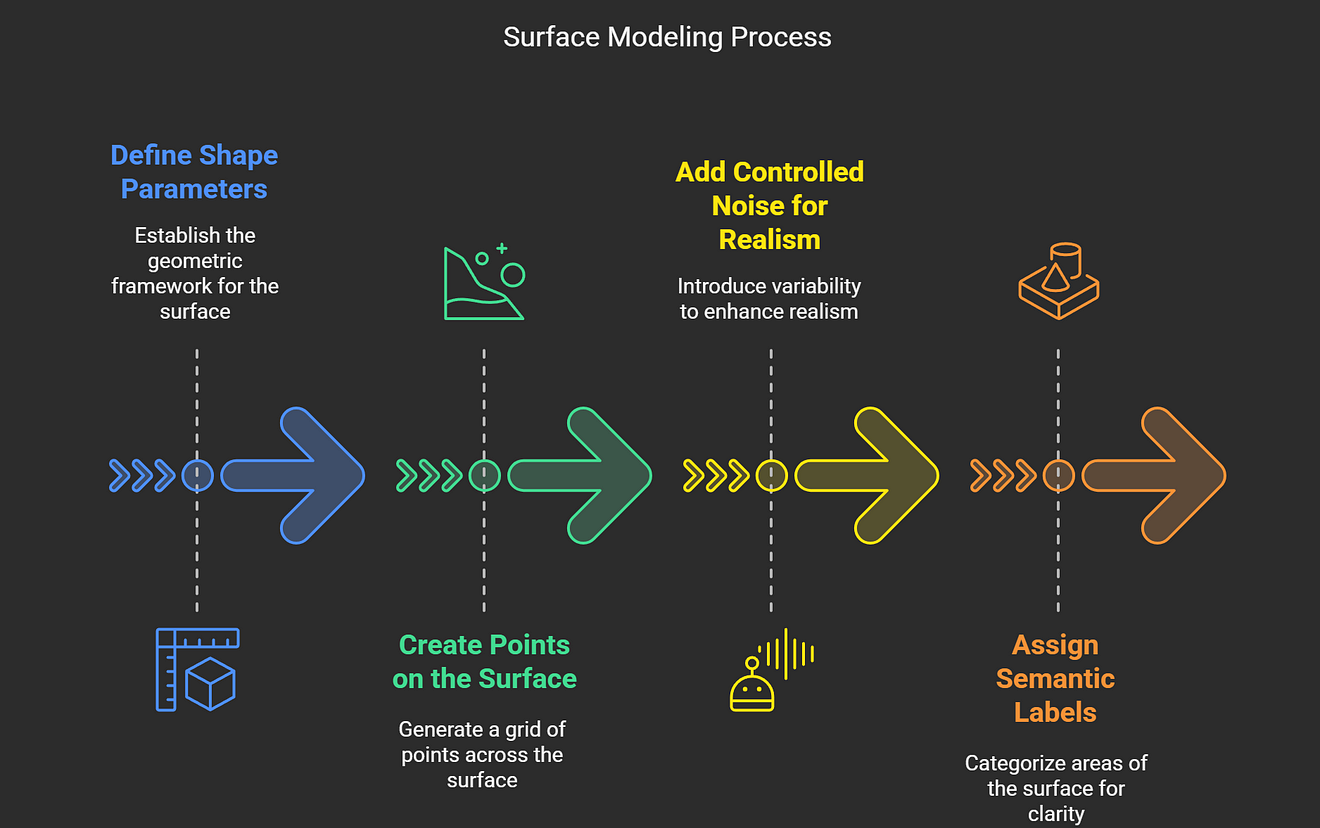
Our shape generator for Synthetic point cloud generation can thus follow a similar pattern:
- Define the shape parameters
- Create points on the surface
- Add controlled noise for realism
- Assign semantic labels
To guide you on this objective, here’s how we generate a horizontal plane like a floor or ceiling:
def generate_horizontal_plane(center, width, length, point_density=100, noise_level=0.02):
    """Generate a horizontal plane with noise"""
    # Calculate number of points based on density and area
    num_points_x = int(np.sqrt(point_density * width))
    num_points_y = int(np.sqrt(point_density * length))

    # Create grid
    x = np.linspace(center[0] - width/2, center[0] + width/2, num_points_x)
    y = np.linspace(center[1] - length/2, center[1] + length/2, num_points_y)
    xx, yy = np.meshgrid(x, y)

    # Create flat points (z constant)
    points = np.zeros((num_points_x * num_points_y, 3))
    points[:, 0] = xx.flatten()
    points[:, 1] = yy.flatten()
    points[:, 2] = center[2]

    # Add random noise
    noise = np.random.normal(0, noise_level, size=points.shape)
    points += noise

    # Create labels (1 for horizontal plane)
    labels = np.ones(points.shape[0], dtype=int)

    return points, labels
This function works by creating a uniform grid of points and then adding subtle random noise to simulate real-world scanner imperfections.
The meshgrid function creates coordinates for every point, which we then flatten into a single array. The final step assigns label “1” to identify these points as part of a horizontal plane.
🦥 Geeky Note: I’ve experimented extensively with different noise distributions. Gaussian noise (normal distribution) provides the most realistic results because it matches the error distribution found in most LiDAR scanners. For cheaper scanners with more systematic errors, consider adding perlin noise patterns instead.
This is not so hard or? The idea is then to replicate this for various shapes.
Let us move and focus on the “Lego” dimension: how to assemble complete rooms.
Assembling Complete Rooms for Synthetic point cloud generation
Creating rooms isn’t about one shape — it’s about combining multiple elements into coherent environments.
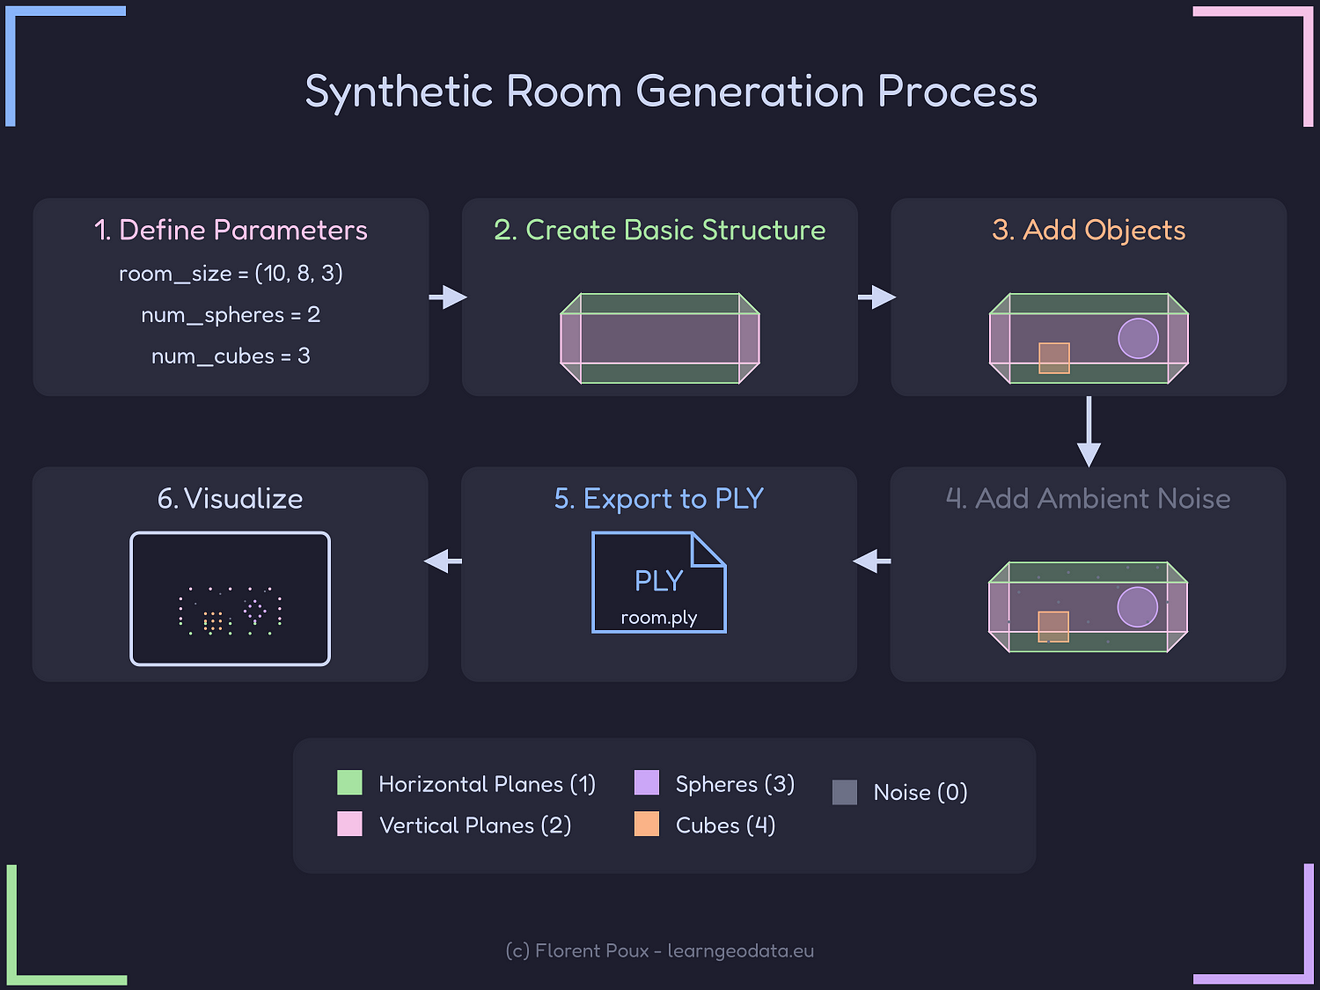
If you look closely learned this workflow, we can see that the stages 1 to 4 permit tus o constitute a complete room:
- Define room dimensions (and parameters)
- Generate floor and ceiling
- Add walls and random objects
- Add ambient noise points
Now, how does this play out with Python?
I will not leave you high and dry; here is the function I use for room generation:
def generate_room(
    room_size=(10, 8, 3),
    num_spheres=2,
    num_cubes=3,
    point_density=50,
    noise_percentage=0.1,
    noise_level=0.02
):
    """Generate a complete room with shapes and noise"""
    all_points = []
    all_labels = []

    # Determine room boundaries
    room_min = np.array([0, 0, 0])
    room_max = np.array(room_size)
    room_center = (room_min + room_max) / 2

    # Add floor
    floor_center = [room_center[0], room_center[1], room_min[2]]
    points, labels = generate_horizontal_plane(
        floor_center, room_size[0], room_size[1],
        point_density=point_density,
        noise_level=noise_level
    )
    all_points.append(points)
    all_labels.append(labels)

    # Add ceiling, walls, and objects (code omitted for brevity)
    # ...

    # Combine all points and labels
    combined_points = np.vstack(all_points)
    combined_labels = np.concatenate(all_labels)

    return combined_points, combined_labels
This function orchestrates the entire generation process. It starts by calculating the room boundaries, then systematically adds elements beginning with the floor.
Each element’s points and labels are stored in separate lists and then combined at the end using NumPy’s vstack and concatenate functions.
🌱 Florent Poux, Ph.D.: In my early coding days, I tried generating all elements directly into one big array. This became unwieldy when I needed to modify or debug specific elements. The “generate separately, then combine” approach makes the code much more maintainable and easier to extend with new shape types.
Beautiful, now we can move onto the saving and visualization part.
Saving and Visualizing Results of our Synthetic point cloud generation
Once we’ve generated our point cloud, we want to visualize and use it outside only Python; This is important, especially because point cloud plays well in a large ecosystem of closed-source software.
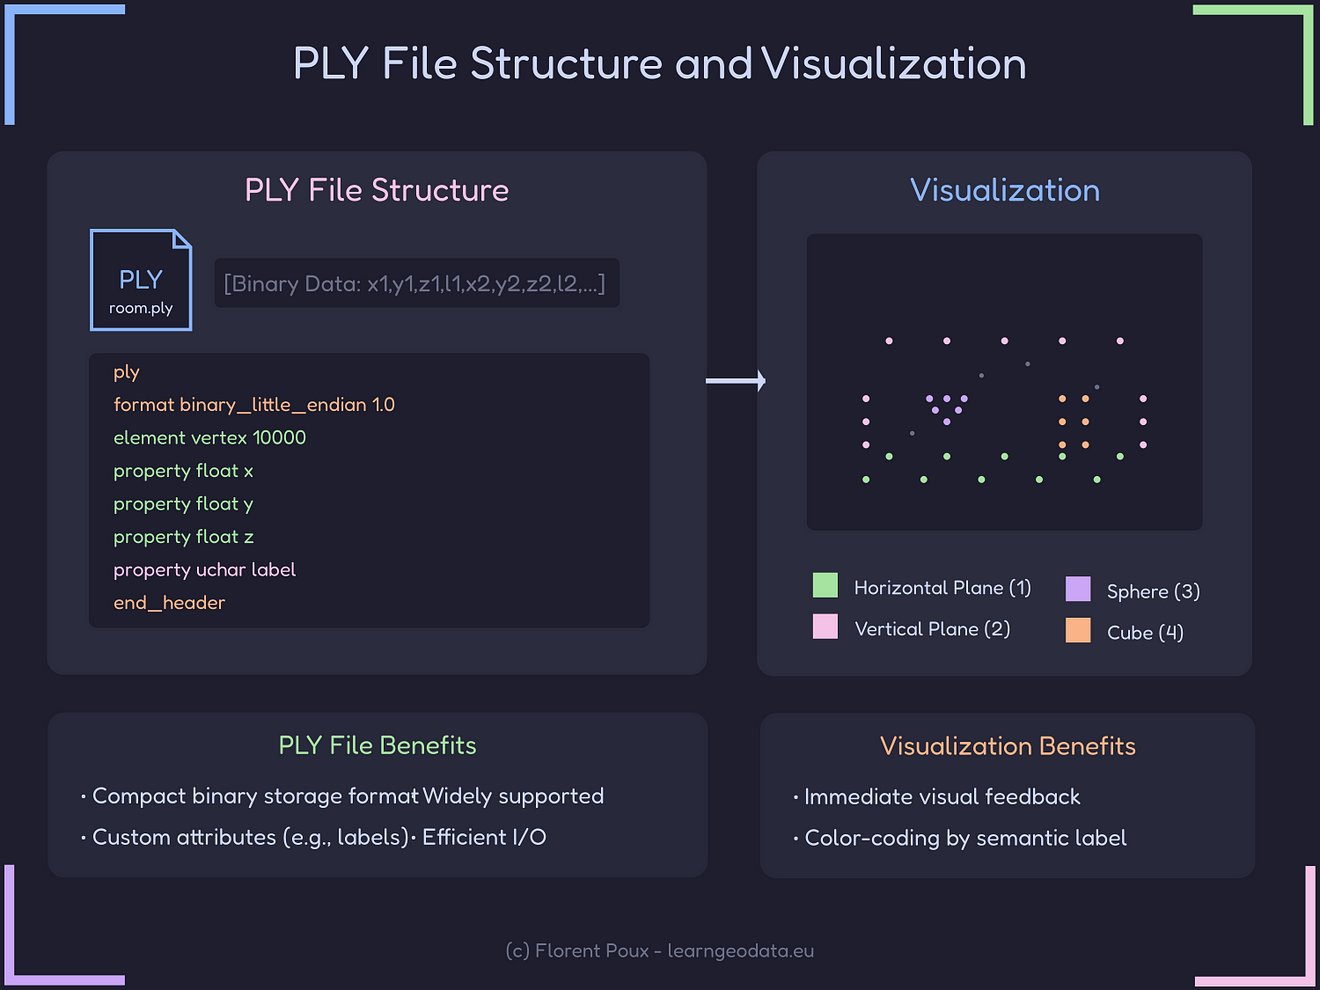
This means that we need to store it in a format that’s both compact and widely compatible. After extensive testing with various formats, you can quickly see that the PLY (Polygon File Format) is a great option!
But how can we write to ply with the label as well?
Well, good news, here is a solution in Python:
def write_ply_with_labels(points, labels, filename):
    """Write point cloud with labels to PLY file"""
    # Create vertex with coordinates and label
    vertex = np.zeros(len(points), dtype=[
        ('x', 'f4'), ('y', 'f4'), ('z', 'f4'),
        ('label', 'u1')
    ])

    vertex['x'] = points[:, 0]
    vertex['y'] = points[:, 1]
    vertex['z'] = points[:, 2]
    vertex['label'] = labels

    # Write to file
    ply_header = '\n'.join([
        'ply',
        'format binary_little_endian 1.0',
        f'element vertex {len(points)}',
        'property float x',
        'property float y',
        'property float z',
        'property uchar label',
        'end_header'
    ])

    with open(filename, 'wb') as f:
        f.write(bytes(ply_header + '\n', 'utf-8'))
        vertex.tofile(f)
This function handles the tricky details of the PLY format.
First, it creates a structured NumPy array with named fields for each point attribute. Then, it writes a properly formatted header followed by the binary data.
The binary format is significantly more compact than text-based alternatives — I’ve seen 5–10x file size reductions compared to CSV or ASCII PLY.
🦥 Geeky Note: I’m using ‘f4’ (32-bit float) for coordinates instead of ‘f8’ (64-bit double) because the extra precision adds file size without meaningful benefits for most applications. Similarly, ‘u1’ (unsigned 8-bit int) for labels allows up to 255 different classes, which is more than enough for typical segmentation tasks.
At this stage, we have everything ready and working. But what about scaling up with 100% automation?
Let us create entire 3D datasets.
Scaling Up: Creating Synthetic point cloud Datasets
The real power of synthetic data is generating variations with minimal effort. Generating 1 room or 1 billion should take the same “human-level” effort.
And we do not have to use the fanciest AI tool for that. Just our brain and a bit of logical thinking to parameterize specific components.
To help you down this path, here is a function that automates the creation of entire datasets:
def generate_room_scenes(num_scenes=5, output_dir="synthetic_rooms"):
    """Generate multiple room scenes and save them as PLY files"""
    os.makedirs(output_dir, exist_ok=True)

    for i in range(num_scenes):
        # Generate random room parameters
        room_size = (
            np.random.uniform(5, 15),  # width
            np.random.uniform(5, 15),  # length
            np.random.uniform(2.5, 4)   # height
        )

        num_spheres = np.random.randint(1, 5)
        num_cubes = np.random.randint(1, 7)

        # Generate room
        points, labels = generate_room(
            room_size=room_size,
            num_spheres=num_spheres,
            num_cubes=num_cubes
        )

        # Save PLY file
        filename = os.path.join(output_dir, f"synthetic_room_{i+1}.ply")
        write_ply_with_labels(points, labels, filename)
This function creates a directory for our dataset and then generates multiple rooms with randomized parameters.
Each room has different dimensions and object counts, creating natural variation across the dataset. The results are saved as sequentially numbered PLY files.
🌱 Florent Poux, Ph.D.: When I first implemented this, I made the mistake of using fixed random seeds for reproducibility during development. This created subtle biases in my training data because the “random” variations followed the same pattern. Always use truly random parameters for production datasets!
And that is it! All that is left for you, is to put these experiments to the test, and truly build a new skill to your 3D data science journey.
Now, for the few that read until there, here is where it gets truly fun: what ideas could I share, and insights from years of R&D would steer your developments?
Practical Applications and Lessons Learned
Over the years, I’ve applied this synthetic data approach across multiple projects.
Here are 5 real-world applications I’ve personally implemented:
- Training segmentation networks: I’ve used synthetic rooms to pre-train networks that were later fine-tuned on smaller real datasets, reducing annotation needs by over 80%.
- Benchmarking algorithms: When developing a new plane detection algorithm, I used synthetic data with known planes to measure exact precision and recall.
- Classroom teaching: These generated rooms make perfect teaching examples since students can see both the raw data and the perfect ground truth.
- Augmented reality testing: For an AR project, we used synthetic rooms to test occlusion handling without lengthy physical setups.
- Scanner calibration: By comparing real scans to synthetic data of the same room, we identified and corrected systematic errors in our scanner setup.
You can find most of them online, as I like to work in an open-access/open-source manner.
🦥 Geeky Note: For professional projects, I maintain a “generation configuration” file that documents exactly how each synthetic dataset was created. This is invaluable for reproducing results and understanding model behavior months later.
But what about where you can steer the boat from there?
Limitations, Perspectives, and Where This Shines
After creating thousands of synthetic rooms for various projects, I’ve gained perspective on where this approach excels and where it falls short.
Limitations I’ve Encountered
While synthetic data is powerful, it’s not perfect. Here are the key limitations I’ve faced:
- The reality gap: Despite careful noise modeling, synthetic data still looks “too perfect” compared to real scans. Real environments have complex occlusions, reflections, and material properties that are challenging to simulate.
- Limited shape vocabulary: Our basic primitives (planes, spheres, cubes) don’t capture the complexity of real-world objects like chairs, plants, or electronics. You can extend the system with more shapes, but each adds complexity.
- Unrealistic distributions: Random placement of objects creates rooms that don’t match typical human arrangements. Real furniture tends to follow certain patterns (chairs around tables, beds against walls) that aren’t captured by simple random placement.
- Point density modeling: Real scanners have distance-dependent density (closer objects have more points), which is tricky to model correctly.
- Material properties: Our approach doesn’t model surface reflectivity, transparency, or other material properties that affect real-world scanning.
I’ve partially addressed some of these limitations in my professional implementations, but they remain challenges for the simplified approach presented here.
Now, where does it shines?
Where Synthetic Data Really Shines
Despite these limitations, I’ve found synthetic data to be incredibly valuable in specific scenarios:
- Algorithm development and debugging: When you need perfect ground truth to validate algorithm behavior, synthetic data is unbeatable. I’ve saved countless hours by testing on synthetic data before moving to real scans.
- Pre-training for transfer learning: Models pre-trained on large synthetic datasets and then fine-tuned on small real datasets often outperform those trained only on real data. I’ve seen 15–20% performance improvements with this approach.
- Education and demonstration: For teaching 3D concepts, synthetic data provides clarity that real-world noise would obscure. Students grasp concepts more quickly with clean, labeled examples.
- Bootstrapping projects: When starting a new 3D project with no existing data, synthetic generation lets you begin development immediately while real data collection happens in parallel.
- Testing rare scenarios: For safety-critical applications, synthetic data lets you test unusual or dangerous scenarios without real-world risk. I’ve used this approach for testing autonomous navigation systems in edge cases.
Future Perspective
Looking ahead, I see several exciting possibilities for synthetic data generation.
First, using Generative Adversarial Networks to make synthetic data more realistic is already showing promise in research. I’m currently experimenting with this approach to narrow the reality gap.
Then, incorporating proper physics simulation for scanner behavior would address many of the realism issues. This is computationally expensive but becoming more feasible.
Finally, integrating with libraries of pre-made 3D models would expand beyond basic primitives, creating more realistic environments. On top of that, implementing rules about how objects relate to each other (scene grammar) would create more realistic room layouts (3D scene grammar).
I believe that synthetic data can dramatically reduce the amount of real data needed for effective systems, especially if you plan on building detection systems with AI.
Take the Next Step 👣
Creating your own synthetic 3D data doesn’t have to be complicated.
The code examples here demonstrate the core concepts, but there’s much more to explore. I’ve refined these techniques over years of professional work in 3D data processing.
To take your 3D generation skills further:
- Download the implementation code from GitHub 💻
- Generate your first synthetic room in under 5 minutes 🌍
- Explore advanced visualization techniques covered in the full tutorial.
For those looking to apply these concepts professionally in segmentation projects, check out my comprehensive 3D Segmentor OS course. It expands on these foundations with production-ready code and advanced techniques I’ve developed through years of real-world projects.
Questions and Answers about Synthetic point cloud generation
A: The main libraries required are NumPy for numerical operations, Open3D for point cloud handling and visualization, and Matplotlib for additional visualization options. Standard Python libraries like os and random are also used.
A: You can customize room dimensions by modifying the room_size parameter in the generate_room function. This parameter takes a tuple of (width, length, height) in your preferred units (typically meters).
A: Yes! The modular design makes it easy to add new shape generators. Create a new function following the pattern of existing ones (like generate_sphere or generate_cube), then integrate it into the generate_room function.
A: Use the base_point_density parameter in the generate_room function. Higher values create more detailed point clouds but increase file size. Values between 50-200 work well for most applications.
A: The base implementation creates single rooms, but you can extend it to create multiple connected rooms by generating each room separately and combining them with proper spatial positioning.
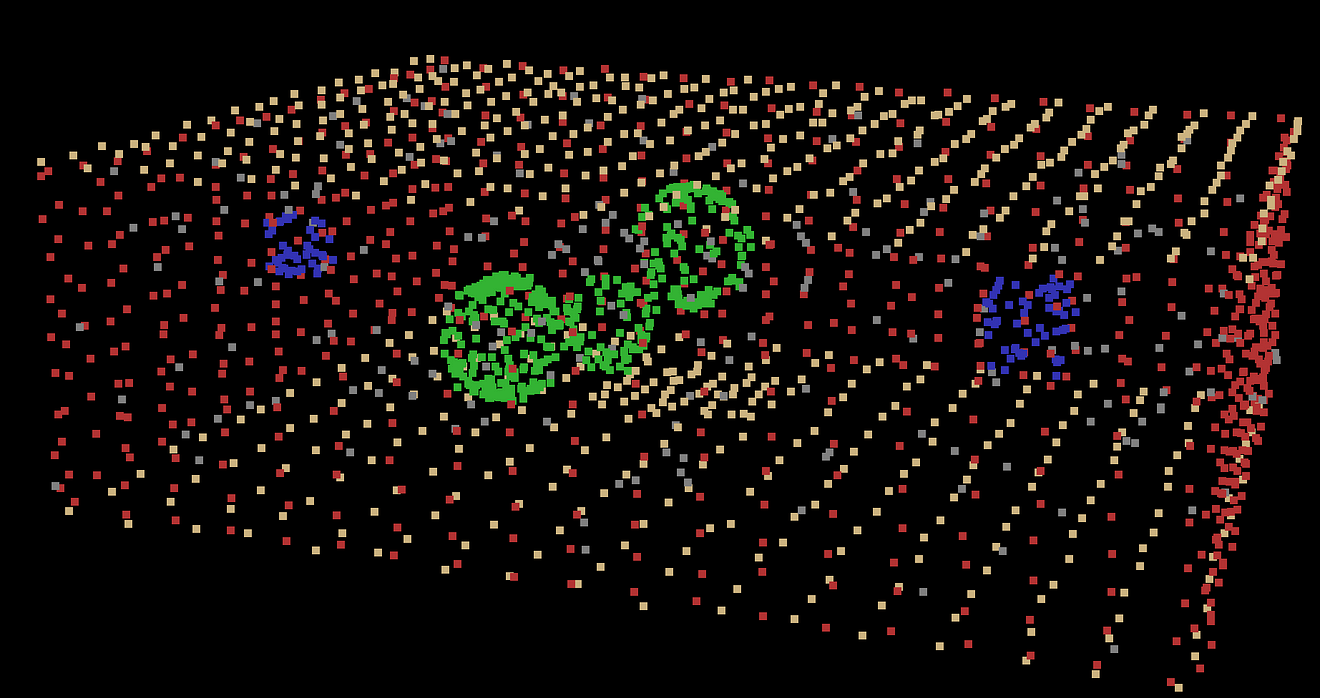
A: Use the provided visualize_point_cloud function that leverages Open3D’s visualization capabilities. It color-codes points based on their semantic labels for easy interpretation.
A: Yes! The generator creates perfectly labeled point clouds, making them ideal training data for semantic segmentation algorithms. You can generate unlimited variations to create robust training datasets.
A: The generator saves point clouds in PLY (Polygon File Format) binary format, which efficiently stores both coordinate data and semantic labels while remaining compatible with most 3D software.
Going Further
Open-Access Tutorials
You can continue learning standalone 3D skills through the library of 3D Tutorials
Latest Tutorials
- 3D Point Cloud Labeling from Photos with Python (and why AI can’t design it for you)
- 3D Pipeline Architecture: A Founder’s Blueprint
- Multi-View Engine for 3D Generative AI Models (Python Tutorial)
- 3D Scene Graphs for Spatial AI with NetworkX and OpenUSD
- 3D Reconstruction Pipeline: Photo to Model Workflow Guide
Instant Access to Entire Learning Program (Recommended)
If you want to make sure you have everything, right away, this is my recommendation:
Cherry Pick a single aspect
If you want to make sure you have everything, right away, this is my recommendation (ordered):
1. Get the fundamental 3D training (3D Bootcamp)
1. 3D Reconstruction (The Reconstructor OS)